A Shower Tile Repair, not the Nightmare the Owner Feared
The problem: Elevated moisture readings in a pre-sale building report
Prior to putting their home on the market, the owners of this Kilbirnie property had a standard pre-purchase building report carried out. To their concern, the inspector flagged a cracked tile and elevated moisture readings on the bathroom wall directly adjacent to the shower box.
A building report listing moisture issues can easily stall a property sale or force a massive reduction in the asking price. On the surface, the problem appeared to be the cracked tile sitting on the curved shower tray rim. This potentially meant water was penetrating into the internal wall framing and causing costly structural rot. Facing a tight real estate deadline, the owners needed to identify the exact source of the leak and resolve it decisively before the open home commenced.
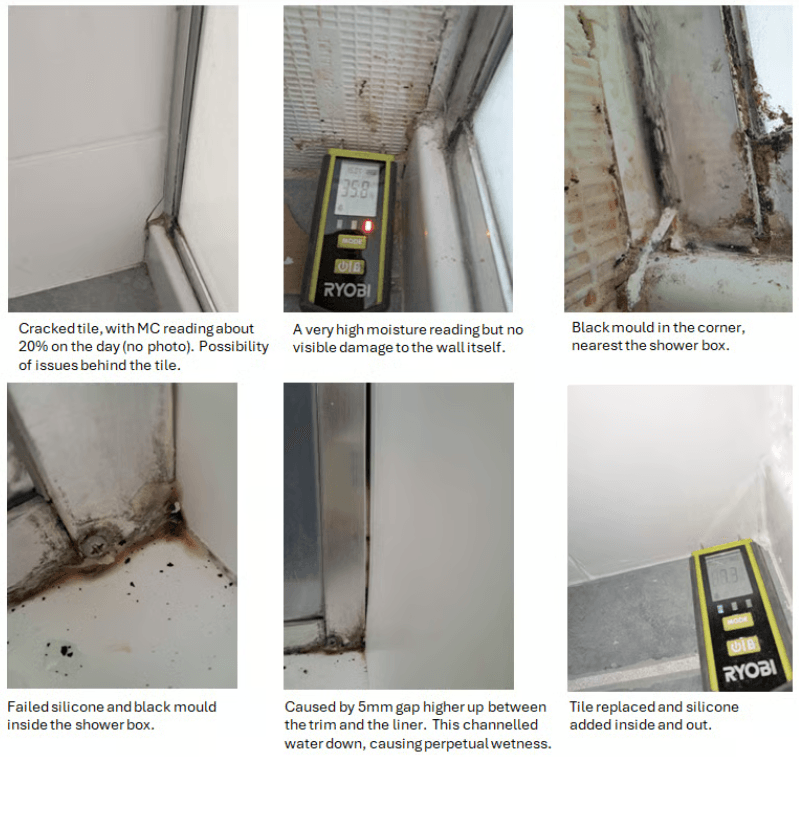
Our observation: The cracked tile was a red herring; the real cause was a gap in the trim
We that the most obvious symptom was not actually the root cause of the moisture:
1. High moisture meter readings
Using a digital moisture meter, we confirmed a high moisture content reading of around 20% in the immediate area. However, there was no active structural buckling or soft decay visible on the wall face itself.
2. The cracked tile was a red herring
Closer inspection showed that the crack in the tile on the curved shower tray rim was a superficial defect. It was simply the result of a rough, forced installation when the bathroom was originally lined, rather than a point of major water ingress.
3. A gap in the trim
Looking up, we discovered the true culprit: an unsealed 5mm gap between the aluminum shower trim and the acrylic liner. Over time, the original silicone seal inside the shower box had deteriorated. Whenever the shower was used, water was quietly channeling directly into this small gap, running down behind the trim, and creating a state of perpetual wetness that bred the black mould in the corner.
The solution: Target the root cause, cosmetic tile replacement, and precise sealing
To the owner's immense relief, an elaborate and disruptive wall demolition was not needed; just a pragmatic fix for the actual source of the problem. A simple shower tile repair was all that was needed.
Removed and replace the damaged tile
We carefully removed the single cracked tile on the curved shower tray rim to inspect the framing directly behind it. Once we verified the internal timber was completely structurally sound and free of rot, we installed a matching tile onto the rim.
Clean and treated the mould
After thoroughly removing the failed silicone, we treated the corner junction with an anti-microbial wash to eradicate the black mould spores, and used a heat gun to dry out the area completely.
Comprehensive silicone water-proofing
The 5mm gap and the entire trim perimeter was re-sealed using high-grade, mold-resistant wet area silicone. We applied the sealant cleanly inside and out, restoring the shower box to a completely watertight state.
The result: A dry bathroom ready for market presentation
Shower tile repair can uncover costly complications, But for this family, with the actual (and actually pretty minor) leak source identified and sealed, follow-up testing confirmed the area returned to normal moisture levels. The shower was left looking immaculate and "beautiful again", giving the homeowners total confidence when presenting the building report to prospective buyers.